Ever found yourself running out of disk space on your Linux system? 😱 Well, grab a coffee ☕ and let me tell you about my recent adventure extending a logical volume using LVM (Logical Volume Management). It’s less scary than it sounds, I promise! 🤞
The Initial Problem 🤔
Our story begins with a simple df -h command that revealed my system was running low on space. The volume group /dev/vg/sys was nearly full, and it was time for some disk magic. ✨
Step 1: Expanding the Physical Disk 💾
First, I needed to expand the underlying physical disk. In my case, I was working with a VMware virtual disk that needed to be increased from around 59GB to 69.8GB. This was done through the virtualization platform.
Step 2: Updating the Partition Table 🧩
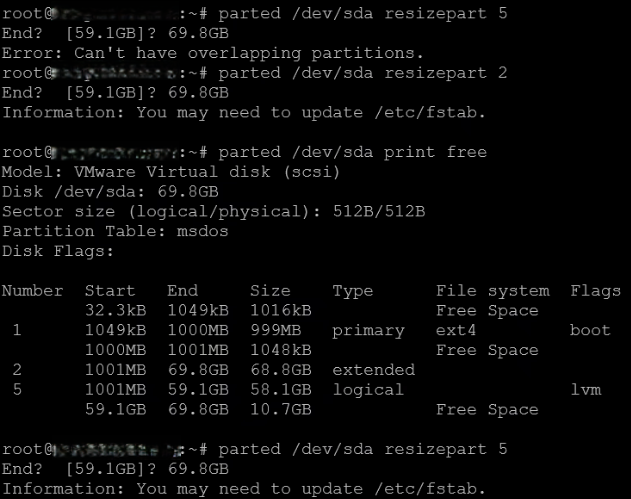
After expanding the virtual disk, I ran into an interesting challenge – overlapping partitions! 😅 This is a crucial detail that could trip up many administrators. Here’s how I handled it:
1. First, I checked the current partition layout:
lsblk
This showed me that sda5 was a logical partition within the extended partition sda2. 🔍
2. I attempted to resize partition 5 directly:
parted /dev/sda resizepart 5But got an error about overlapping partitions. Oops! 🚫 This makes sense because we need to handle the extended partition (sda2) first!(see the image below)
3. So, I resized the extended partition (sda2) first:
parted /dev/sda resizepart 2
End? [59.1GB]? 69.8GB
4. Only then could I successfully resize partition 5:
parted /dev/sda resizepart 5
End? [59.1GB]? 69.8GB
Pro tip: When dealing with logical partitions (like sda5) within an extended partition (sda2), always resize the extended partition first! 🎯
Step 3: Physical Volume Resize 🔄
Now that we’ve resized the partition, we need to tell LVM about the new space. This is done using the pvresize command:
pvresize /dev/sda5This command updates the physical volume to recognize the newly available space. Magic! ✨
Step 4: Extending the Logical Volume 📦
Here’s where my first attempt went sideways. I tried:
lvextend -l +100%FREE /dev/vg/sys
But got an error about invalid arguments. 🤦♂️ Learning from my mistakes, I switched to using -L instead:
lvextend -L +10G /dev/vg/sys
Success! 🎉 The system reported:
“Size of logical volume vg/sys changed from <53.14 GiB (13603 extents) to <63.14 GiB (16163 extents).”
Step 5: Filesystem Resize 🌱
Finally, the last step is to resize the filesystem to use the newly available space:
resize2fs /dev/vg/sys
This step is crucial – without it, your filesystem won’t be able to use the new space even though the logical volume has been extended. 🔑
Verification ✅
To confirm everything worked as expected, I ran:
df -h And voilà! 🎊 The output showed my newly expanded filesystem with 21G available space, up from the original capacity.
Tips for the Brave 💪
- Always backup: Before attempting any disk operations, make sure you have good backups 💾
- Handle partition hierarchy: Remember to resize extended partitions before their logical partitions 📝
- Follow the LVM chain: Physical disk → Partition → Physical Volume → Logical Volume → Filesystem 🔗
- Keep commands handy: Save these commands somewhere safe – you’ll probably need them again! 📋
Conclusion 🎬
LVM might seem intimidating at first, but it’s actually a powerful tool that makes disk management much more flexible. Just remember to take it step by step, and always verify your commands before hitting enter. And most importantly – don’t forget about those partition hierarchies! 🚀
Remember, in the world of system administration, patience is not just a virtue – it’s a requirement! 🧘♂️
Happy disk extending! 🎯
